
Postman
SAMPLE REQUEST API
With ESPAY, you can sample API requests for all of our links / urls through our POSTMAN Collection.
WHAT IS POSTMAN?
Postman is a free visual editing tool for making and testing API requests. Unlike other methods for interacting with APIs (for example, using cURL), Postman makes it easy to edit API requests, view header information, and much more. Postman has the ability where you can store collections or libraries with sample API requests that are ready. To help customers get started with our REST API, we have provided a collection of ready-made examples for all our API links / urls.
USING POSTMAN ESPAY COLLECTIONS
If you have a Postman account (MacOS, Windows and Linux versions can be downloaded from the website here), you can open our Postman documentation in your own Postman application (click the "Run In Postman" button below). Then you can create the scope or use the scope of our ESPAY REST API as a sample template and to edit the POST and GET requirements that are available to suit your needs.
SET UP YOUR POST SCOPE
The Postman ESPAY collection uses a {{instance_url}} instance template to replace your ESPAY instance's REST API URL with pre-made requirements and the {{api_key}} variable for your API key. Compared to having to manually edit all the requirements in a collection, you can set this variable in the scope of your Postman. You can choose (template) examples of the scope of our ESPAY REST API from the drop-down list and replace them with your own variable values, or you can set your own scope.
For settings, follow these steps:
- Click the gear icon in the upper right corner of your Postman application.
- Select "Manage Environments" to open a modal window that displays your active scope.
- Click Add in the lower right corner of the Modal window to create a new scope.
- Name the scope (for example, "ESPAY API Request") and add keys, for example: instance_url and api_key with values that match your ESPAY instance and ESPAY REST API key.
Note:
Within the body of a POST request, api_key must be enclosed in quotation marks: "MY-API-KEY-SAMPLE". In GET URL, it doesn't need to be like that. We have made this format available to you in the POST request body, GET URL, and templates (example framework) the scope of YOUR-API-KEY-HERE.
USING THE REQUIREMENTS THAT HAVE BEEN MADE BEFORE THE COLLECTION
After configuring your scope, you can use the requirements that are already in the list as templates (sample templates) to make new API requests. To use one of the ready-made requirements, you can click on the Collection menu to the left of Postman. This opens the request as a new tab in the main window of the Postman application.
Generally, there are two types of requests that are accepted by the ESPAY API link: GET and POST. Depending on which HTTP method the link uses, you must edit the package that is packaged differently.
CHANGED POST REQUESTS
When changing a POST request, you must open QUERY and navigate to the BODY section in the Query Editor. For easy reading, select the RAW radio button to format the JSON request body.
CHANGED GET REQUEST
When changing a GET request, you must change the parameters sent in the request URL. To be able to change it easily, select the PARAM button next to the URL booth and change the key_value pair on the page that appears below the URL booth.
SENDING YOUR REQUESTS
After your API request is ready to be sent, click the Submit button next to the URL booth. Requests are sent and response data entered in the section under Request editor. From here, you can view the raw data returned by the ESPAY API, view the HTTP response code, determine the request processing time, and view header information.
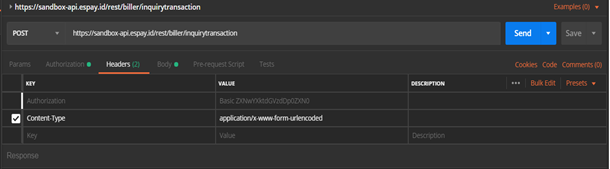
Following is a sample guide in making the Biller purchase process:For requests, use the url-encoded http post form, with authorization = basic auth
For a more detailed explanation, can be seen in the image below. The picture is the result of capture of the steps for the inquiry process. The Inquiry process is needed to get the price details of the desired Biller product.
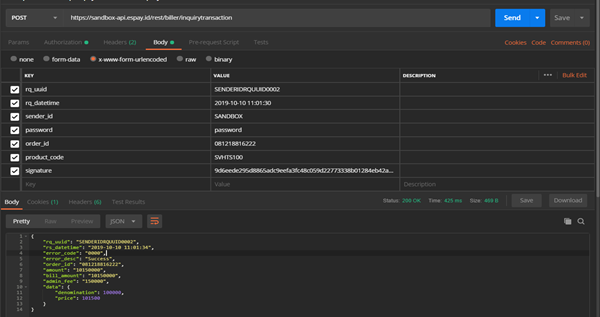
Next, a display will appear as below during the Request Inquiry process. By pressing the "Body" tab you can fill in and complete the parameters needed to be able to send it back
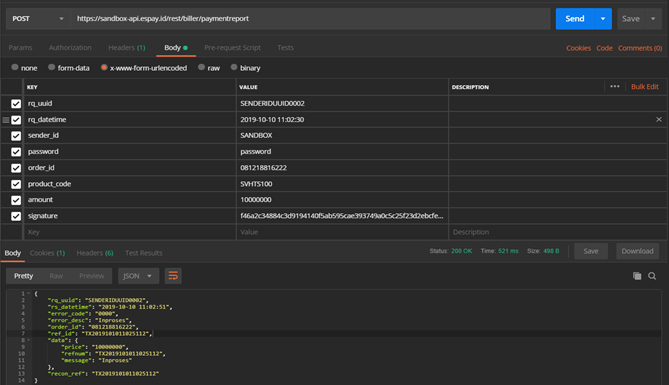
After that, proceed to the payment stage for the desired Biller product as shown below